Quicklert Installation&Configuration Guide
Version 2.0
QUICKLERT INSTALLATION VERSION 2.0
PHYSICAL AND VIRTUAL SERVER MINIMUM REQUIREMENTS
Make sure your system meets the following minimum hardware/software requirements:
Windows Server 2016/2019 Standard 64-bit English/United States version:
doneAll Windows critical/important updates
doneCPU – 2 socket with 2 cores
done6GB Memory
doneHard drive space 80GB
done(1) 1GB NIC with a static IP address
Remove any installation of any version of MS SQL. Also, IIS needs to be disabled on the server.
NETWORK CONFIGURATION WILL REQUIRE FOLLOWING ON THIS SERVER:
doneA NATed or public IP address
doneLocal firewall TCP/UDP ports open to have internal IP access to the PBX and Active directory (if it is used).
doneOn customer’s firewall have following ports open to this sever:
• Inbound and outbound secured HTTPS (443) port.
• Outbound SMTP port or whatever email port they will need to email notification going out of their servers.
SSL CERTIFICATE & CONFIGURATION
For alerts going to the smartphone and devices, there are some special requirements for SSL certificate (HTTPS) for this server. If client is going to use their own domain name for incoming connection from the clients to connect with the server. They will need to provide a valid Tomcat/Apache 8.x version keystore file with credentials during the configuration phase. Alternatively, we can provide a secure certificate at additional charge should client decide to use our certificate on their server.
SOFTWARE DOWNLOAD AND INSTALLATION
doneDownload the install media/file from this link DOWNLOAD on the server where you will be installing the software. Save the download file in a folder on the server.
doneMake sure that you have a public IP address (NATed or real) for the server where you will install the software.
doneMake sure that you have HTTPS (443) enabled from your firewall to this public IP Address.
doneSend this public IP Address to Quicklert support (support@quicklert.com)
DOWNLOAD THE INSTALLER FILE
Start the install process by downloading the installer file ‘QuicklertDigi-10.0.0.2.1036_x64.zip’ from the provided software link.
Save the file to a folder and unzip it: Double-click the ‘QuicklertDigi-10.0.0.2.1036_x64.zip’ or right click and select Open to run the Quicklert installation file.
INSTALLING QUICKLERT
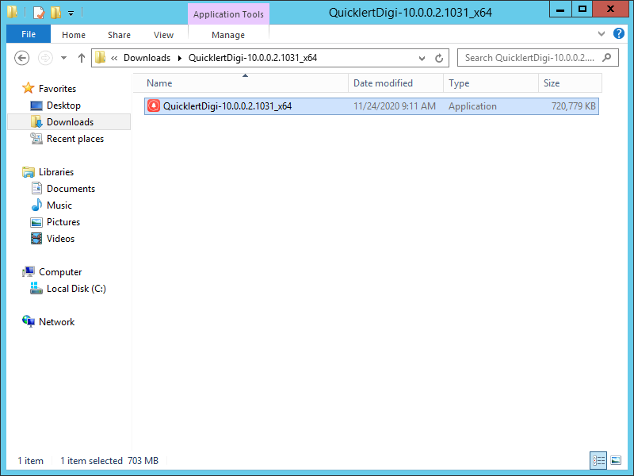
FIGURE 1.1
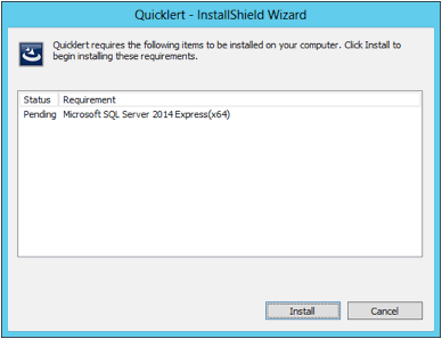
FIGURE 1.2
The Quicklert Installer will then begin to display the minimum requirements (if any) for the software to run on the machine. Click on the Install button to proceed with the Microsoft SQL Server 2014 Express (x64) installation. If the SQL Server is already installed on this machine or server, then this option will not appear and it will move on to the Quicklert Setup Wizard.
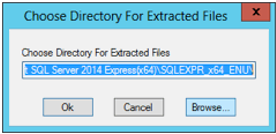
FIGURE 1.3
The Microsoft SQL Server 2014 installer will ask to choose a target directory to extract the files.
WARNING: Remove the default directory that appears on this box and provide a short directory path (For example: C:\SQL2014 or C:\Temp\SQL2014).
Make sure the path is properly entered, or Quicklert may not be installed properly.
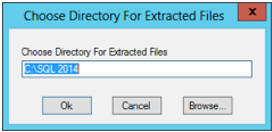
FIGURE 1.4
Click Ok to continue.
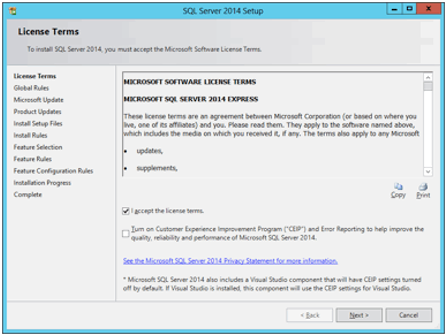
FIGURE 1.5
On the Microsoft SQL 2014 Express License Terms screen, check mark the “I accept the license terms.“ box and then click Next.
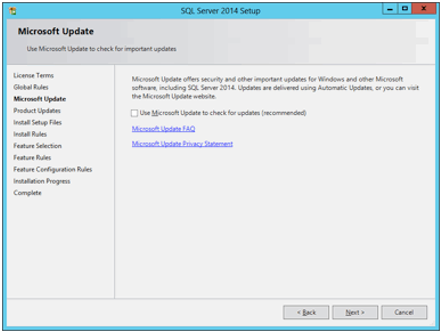
FIGURE 1.6
On the Microsoft Update window, click Next without selecting anything.
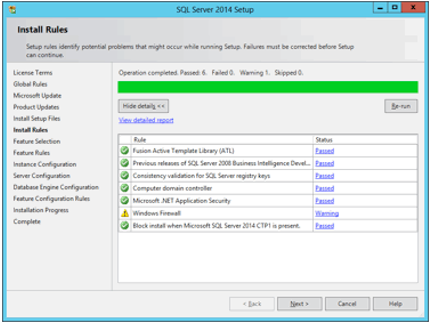
FIGURE 1.7
Verify the “Install Rules” screen, it should not show any errors. Afterwards, click Next.
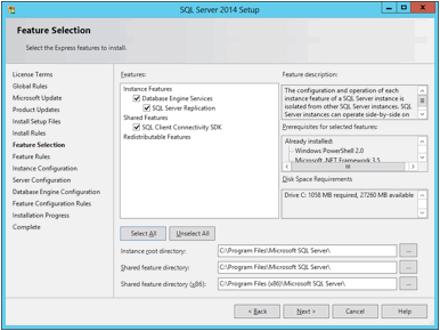
FIGURE 1.8
On “Feature Selection” window, verify that all features are selected, then click Next.
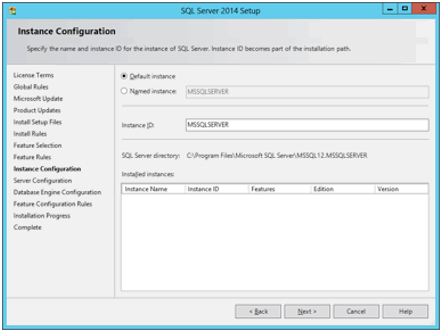
FIGURE 1.9
On “Instance Configuration” window, keep the “Default Instance” radio button selected, then click Next.
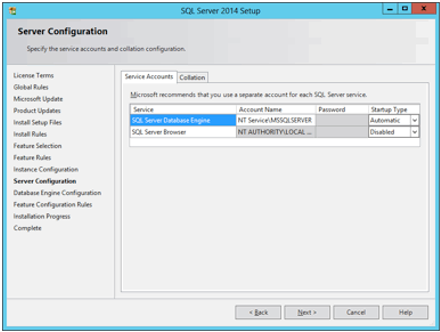
FIGURE 1.10
On “Server Configuration” window, keep the default settings as shown, then click Next.
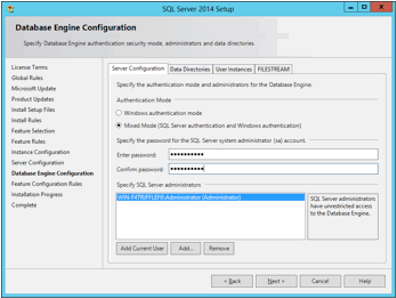
FIGURE 1.11
On the “Database Engine Configuration” window, enter the “sa” password under “Mixed Mode”, and then click Next.

FIGURE 1.12
This will start the Microsoft SQL 2014 Express installation.
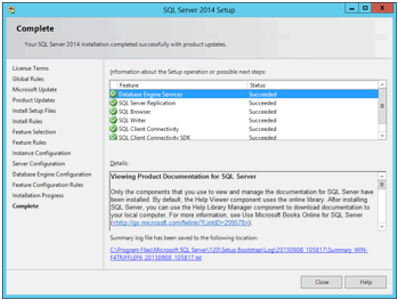
FIGURE 1.13
After completing the installation, the installer displays the results. Verify these results, then click Close to proceed with the Quicklert installation.
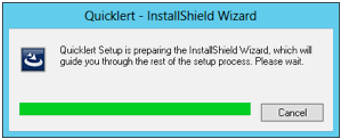
FIGURE 1.14
A setup preparation screen will appear for a brief moment.
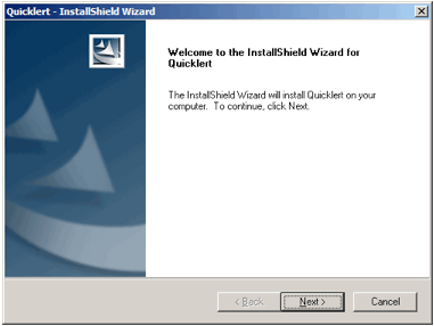
FIGURE 1.15
A welcome screen will appear. Click Next to continue.
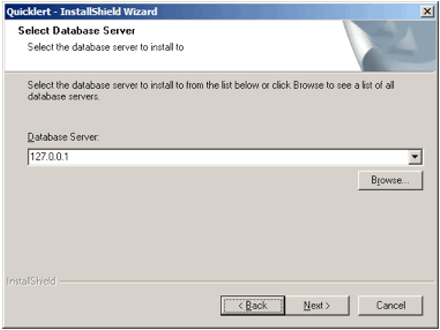
FIGURE 1.16
A Database selection screen will appear with the IP address 127.0.0.1 as the default Database Server IP address. If the IPsession database is not installed on the local server, you will be required to enter the Database Server IP address. Click Next to continue.

FIGURE 1.17
Enter the SQL 'Login ID' and 'Password' in the next screen. This will validate the SQL credentials against the Database server. If authentication fails, then proceed to correct the parameters or verify that the SQL server is installed and that proper authorization is available for the SQL server account.
info_outlineMake sure that you enter the same password as previously chosen on “Database Engine Configuration” window (figure 1.11).
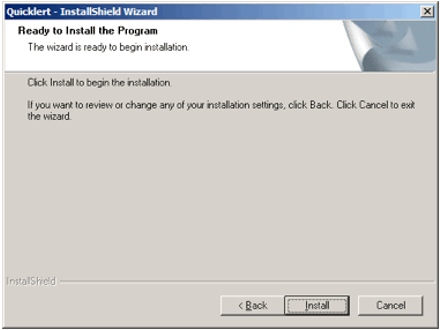
FIGURE 1.18
The Quicklert InstallShield Wizard window appears. Click Install to continue.

FIGURE 1.19
The Quicklert Installer will continue and the Status Setup window will show the installation progress.
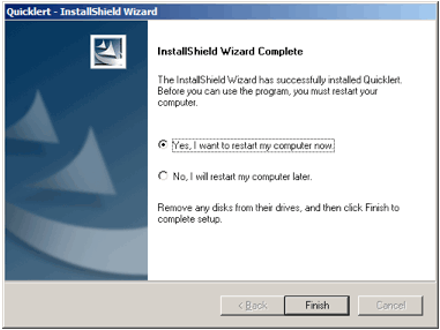
FIGURE 1.20
Once completed, select the 'Yes, I want to restart my computer now' radio button to reboot the server.
QUICKLERT CONFIGURATION
Once the Quicklert software is properly installed, two Desktop icons will appear. Click on the “Quicklert Configuration” icon to proceed to configure the server.
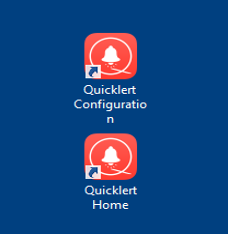
FIGURE 2.0
FIGURE 2.1
The ‘Quicklert Configuration Wizard’ screen appears and it requires the user to enter the administrative ‘User Name’ and 'Password'.
The default login credentials is Administrator, and the default administrator’s password is admin.
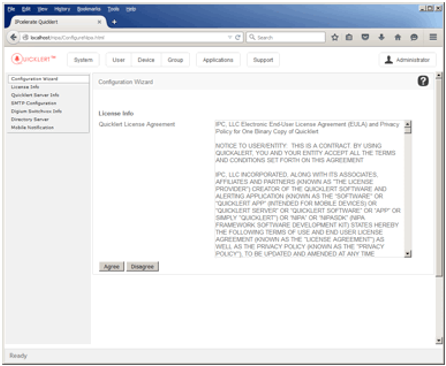
FIGURE 2.2
Read through the 'Quicklert End User License Agreement' window and select 'Agree' if you agree with this End-User License Agreement (EULA). If for any reason you have any questions or concerns regarding the installation of Quicklert in your system, contact Quicklert and/or press the ‘Disagree’ button to discontinue the Quicklert configuration.
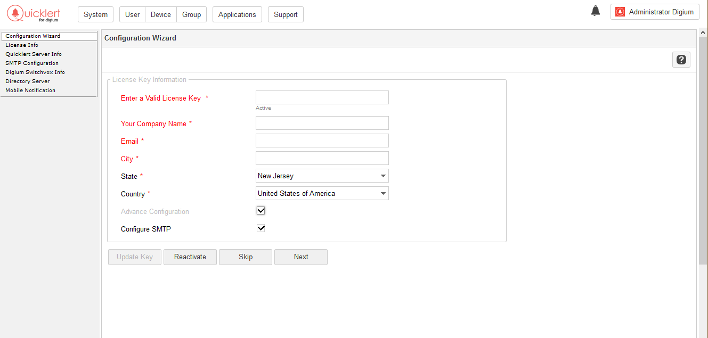
FIGURE 2.3
Assuming you have already received an Ecode(s) with the purchase of the Quicklert software, and thereafter generated a license key for your copy of Quicklert, you may enter it now along with the company name and email address.
If you do not have an Ecode, contact your partner or Quicklert to get or purchase Ecode(s) to generate a license for your system.
Generating a license key is a 3-step process:
checkRegister yourself on the Quicklert License Redemption Portal (https://redeem.Quicklert.com/redeem)
checkRegister your Ecode(s) on the portal
checkRedeem the ‘Previously Registered Ecodes’ for a ‘New Server/For an Existing Server’ using the MAC address of your system/server (where you are installing this product)
If you have problems obtaining a license key, please contact your software partner or Quicklert at support@quicklert.com or call 1-800-789-1034.
After obtaining a generated license key from the portal, you may enter it in the field titled ‘Enter a Valid License Key’. Click Activate to proceed to activate the license key for this server.
Select the ‘Online’ radio button to activate the license via Internet or the ‘Email’ radio button to activate via email. It is always recommend activating Online to prevent any delays or manual errors during installation process. The Email mode may take up to 24 hours to receive the activated license file.
Click Next.
ACTIVATING THE LICENSE KEY VIA ONLINE
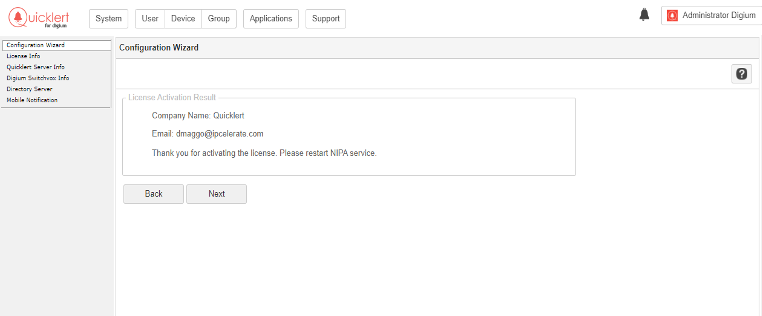
FIGURE 2.4
If the online activation mode is selected, the Quicklert Configuration Wizard will proceed to activate the license by connecting to the Quicklert License Activation Portal (server). If for any reason using the online mode cannot activate the license, then the user should select the Back button to go back one screen to select the ‘Email’ radio button.
ACTIVATING THE LICENSE KEY VIA EMAIL
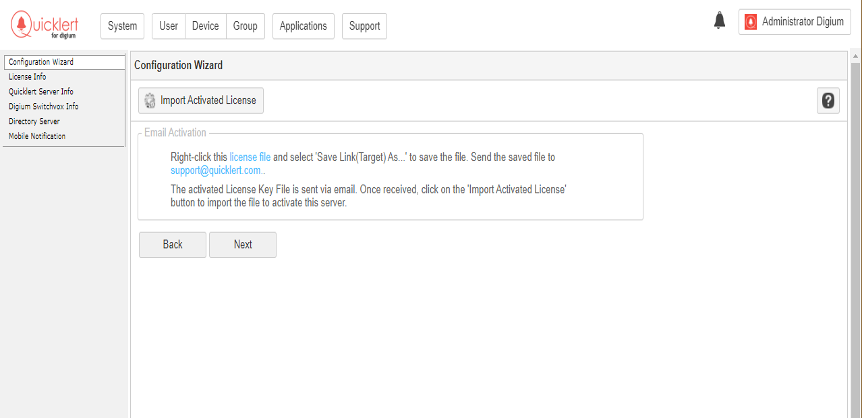
FIGURE 2.5
Once the ‘Email’ radio button is selected, the ‘Email Activation’ screen appears. Proceed to save the license file. Afterwards, send this file as an attachment to ilas@quicklert.com to activate the license key.
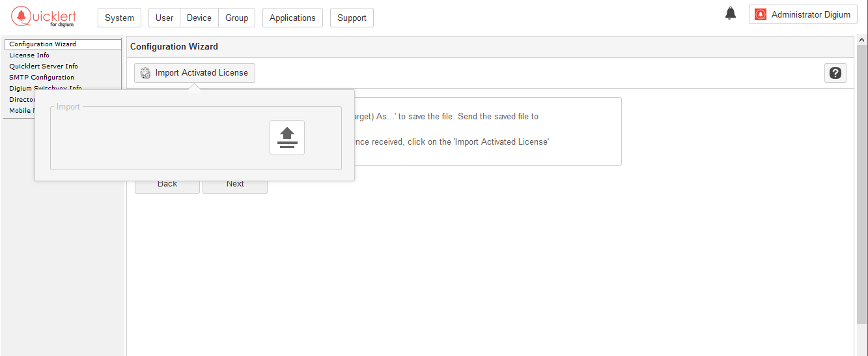
FIGURE 2.6
Once you have received the activated license key from Quicklert, select the 'Import Activated License' button to import/upload the file. The 'Import' popup window will appear. Click on the Browse button to select the file to upload.
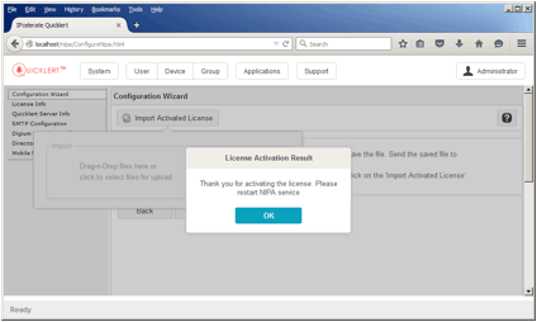
FIGURE 2.7
Once the file has complete uploading, the Quicklert Configuration Wizard displays the license activation result. Click OK.
CONFIGURING THE QUICKLERT SERVER
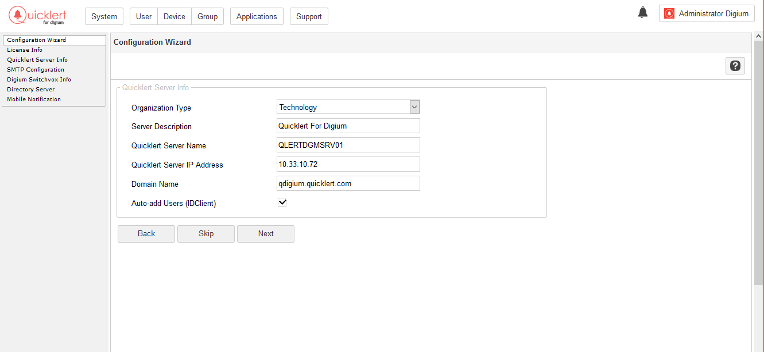
FIGURE 2.8
The Quicklert Configuration Wizard displays the current server name and IP address. Provide a description of this server and enter a domain name for this server (if available). All the users who are downloading the Quciklert app from the Apple or Google store will use this domain name in order to authenticate and login to Quicklert from their mobile (iOS and Android) and desktop clients (MS Windows).
Check the 'Auto-add Users' check box if the Quicklert desktop/PC client should auto-register with a user name and password. It is recommend not enabling this feature. This is helpful during the initial (mass) deployment. Uncheck this box to allow only Quicklert users to register or sign in.
CONFIGURING THE SMTP (MAIL) SERVER
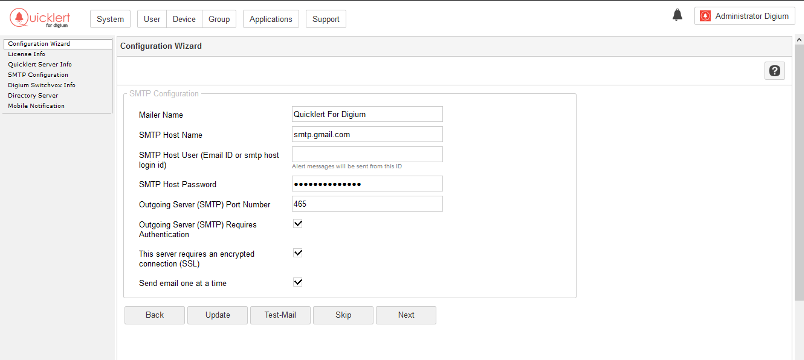
FIGURE 2.9
Provide the SMTP Configuration parameters to send email notifications and email messages:
checkMailer Name: All email messages will show 'Mailer Name' as the email sender (From)
checkSMTP Host Name: The email-id or SMTP host login ID)
checkSMTP Host Password: The assigned password for the SMTP account
checkOutgoing Server Port Number: The port number for the SMTP server to use
checkOutgoing Server Requires Authentication: Select this option if the SMTP server requires authentication
checkThis server requires an encrypted connection: Select this option if the SMTP requires a secure connection (SSL)
checkSend one email at a time: Select this option to send email sequentially.
After completing the SMTP Configuration screen, select Update to save the SMTP parameters. To test the SMTP server, click on Test-Mail to send a test email and verify the given SMTP parameters. Click Next to go to next configuration screen.
CONFIGURING THE DIGIUM SWITCHVOX
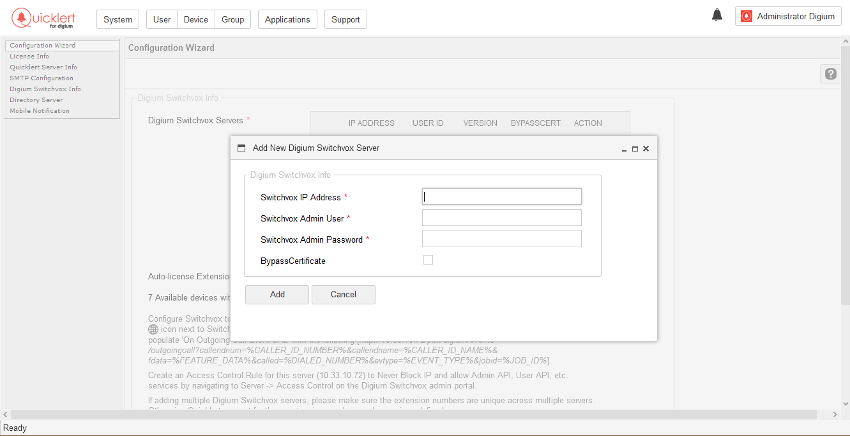
FIGURE 2.10
Provide the following configuration parameters for the Digium Switchvox:
checkDigium Switchvox IP Address
checkSwitchvox Admin User
checkSwitchvox Admin Password
checkBypass Certificate
checkAuto-License Extension
This information is necessary for enabling 911-application integration with your Switchvox system.
Check the ‘Auto-license Extension’ check box if any extension would be allowed to trigger an alert. Otherwise, manage licenses from Device menu after updating device/user list from Digium Switchvox.
Click Update to update this information. Click on the 'Click to update Quicklert with latest device list from Digium Switchvox' link to retrieve extension information from the Switchvox. It will also create users in Quicklert using the extension number. These users can sign in to Quicklert desktop clients or on iPhone/Android Quicklert app to receive notifications.
Go to the ‘Digium Switchvox Admin Portal’ to configure the 'On Outgoing Call Event URL' as shown in the above screenshot (figure 2.10).
Click Next to move on to next screen.
CONFIGURING THE ACTIVE DIRECTORY SERVER
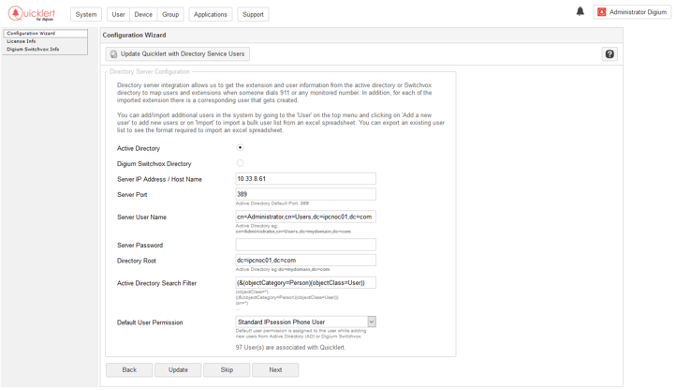
FIGURE 2.11
If there is a need to retrieve users from the Active Directory, then select the 'Active Directory' radio button and enter the pertinent Active Directory login information and search parameters. Otherwise, keep the 'Digium Switchvox Directory' radio button selected.
Click Update to update the selection and related parameters. Click 'Update Quicklert with Directory Service Users' to retrieve users from the directory server. When the 'Digium Switchvox Directory' option is selected, users are also retrieved when the devices are updated with the Switchvox.
Click Next to go to the next screen.
CONFIGURING THE MOBILE NOTIFICATION
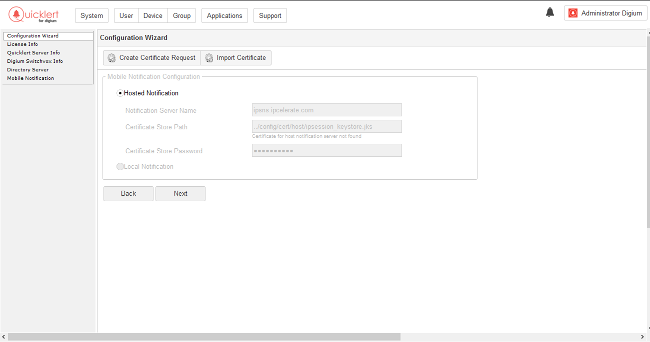
FIGURE 2.12
This screen displays the current server authorization (certification) status with the Quicklert hosted notification server. Currently, none of the fields are editable. The Quicklert hosted notification server is used to send notifications to mobile devices (iPhone and Android).
Click the Create Certificate Request button to create a new certificate request that will be authorized with the Quicklert hosted notification server.

FIGURE 2.13
Enter the details for this certificate:
checkQuicklert Server MAC Address (select the primary MAC addresses listed)
checkCompany Name
checkEmail
checkCity
checkState
checkCountry
Click on Create to create a new request.
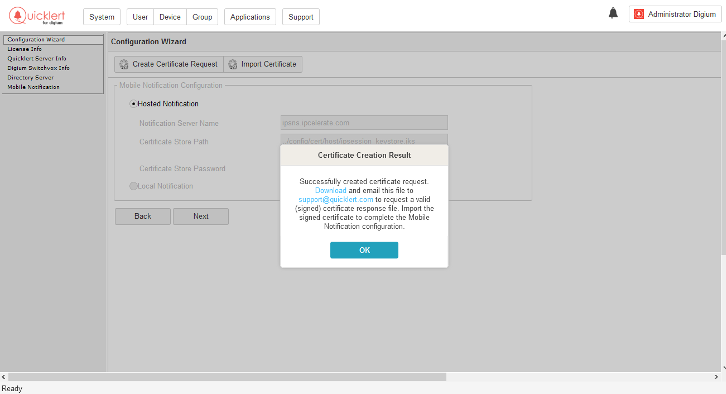
FIGURE 2.14
A new request will be created. Download this file as shown in the 'Certificate Creation Result' screen and email it to support@quicklert.com.
When a response is received from Quicklert, click on the Import Certificate to import the response file.
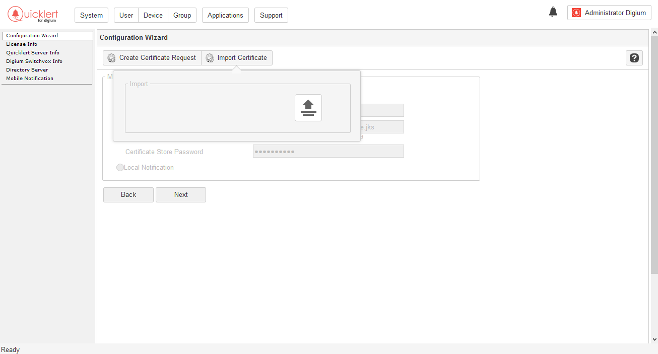
FIGURE 2.15
A new pop-up window will appear. Click on the on Browse button to select the file to upload.
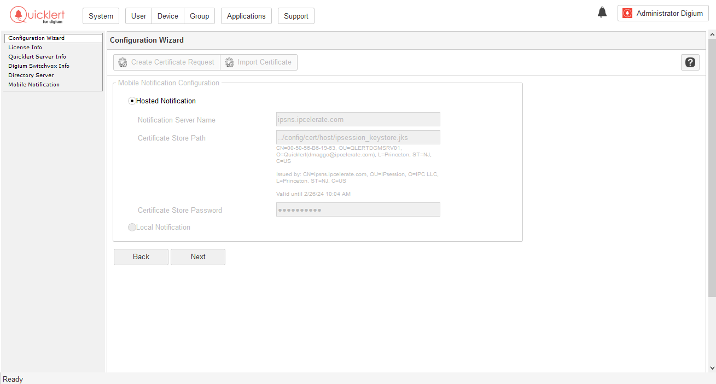
FIGURE 2.16
The Certificate import status message displays. If successful, this page will be refreshed with the certificate details and validity information.
Click Next to go the next ‘Finish’ screen.
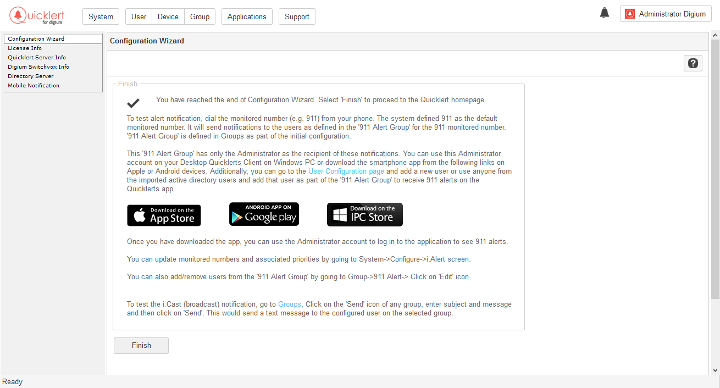
FIGURE 2.17
The ‘Quicklert Configuration Wizard - Finish' screen displays. At this stage, the Quicklert server is configured with default parameters. To add or import more users, groups or monitored numbers, follow the instructions in related sections.
Click Finish to close the Quicklert Configuration Wizard.
After a successful configuration of the Quicklert application, will have the following items are automatically generated in the system by default:
checkA Default Group (this group allows you to send or broadcast a message to all the users in the system and is associated by all users) and a 911 Alert Group –associated only the administrator.
check911 as a automatically monitored as a number –the 911 Alert Groups receives alerts when this number is dialed
checkThree Alert Priority profiles: Normal, Warning and Critical
VALIDATING AND USING THE QUICKLERT APPLICATION
VALIDATING THE QUICKLERT SERVER
To test the Alert Notification feature, dial the monitored number (e.g. 911) from your Switchvox phone. The Quicklert system defined the number 911 as the ‘default monitored number’. It will send notifications to the users as defined in the '911 Alert Group' for the 911 monitored number. '911 Alert Group' is defined in Groups as part of the initial configuration.
This '911 Alert Group' has only the Administrator as the recipient of these notifications. You can use this Administrator account on your Desktop Quicklert Client on Windows PC or download the smartphone app from the following links on Apple Store or Android Store:
Apple:
androidAndroid:
Additionally, you can go to the User Configuration page and add a new user or use anyone from the imported active directory list of users and add that user as part of the '911 Alert Group' to receive 911 alerts on the Quicklert app.
Apple / Android / Quicklert Client for Windows PC
Once you have downloaded the Quicklert app for your OS, you can use the Administrator account to log in to the app and see the 911 alerts.
You can update monitored numbers and associated priorities by going to the System->Configure->i.Alert screen.
You can also add/remove users from the '911 Alert Group' by going to Group>911 Alert, then click on Edit icon.
To test the i.Cast (broadcast) notification, go to Groups, then click on the Send icon of any group, enter the subject and message, then click on Send. This would send a text message to the configured user on the selected group.
ADD A NEW GROUP IN QUICKLERT
To add a new group in Quicklert, click on the Group button on the top menu. It displays all currently configured groups.
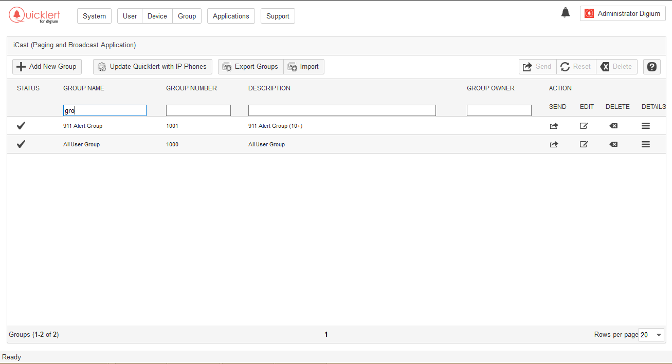
FIGURE 2.18
Click on the Add New Group button to add a new group.

FIGURE 2.19
Enter a group name and description. Provide a group number to identify this group by a number. Add one or more rules to identify users who will receive messages sent to this group, then click on Create & Exit to create and save this group.
A rule can be defined using any of the following user parameters:
checkFirst Name
checkLast Name
checkUser ID
checkCompany name
checkDomain name
checkDepartment
checkOffice
Click on the Show Devices button to display the list of users based on the current rules.
Click on the 'Advance Configuration' check box to assign this group to a specific non-admin user who can manage the configuration of this group.
Enter a PIN number to restrict sending messages to this group from unauthorized users.
ADD A NEW EMERGENCY PHONE NUMBER IN QUICKLERT
To add a new emergency phone number to be monitored by Quicklert application and to generate or send notifications, go to System>Configure>i.Alert, then click on the ‘Configure i.Alert Monitor’ link.
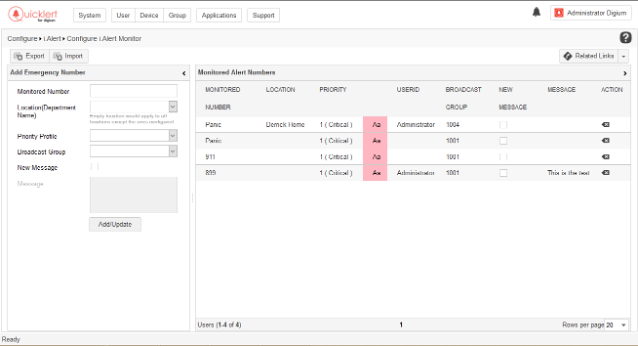
FIGURE 2.20
Add the new 'Monitor Number', and then select a 'Priority Profile' and a 'Broadcast Group'. Afterwards, click on the Add/Update button. If any monitor number was already configured, they will be updated accordingly.
DEFINE A NEW PRIORITY PROFILE IN QUICKLERT
To define a new Priority profile in Quicklert, go to System>Configure>i.Alert, then click on the 'Configure i.Alert Priority Profile' link. This will show currently configured profiles.

FIGURE 2.21
Select Add Priority Profile on the right hand side from the 'Related Links' drop-down menu, and then click on the on the top right corner Related Link icon(below the question mark icon).

FIGURE 2.22
Provide a description, select a priority level, text, background color and then click on the Add Priority Profile button to add a new profile. This priority can be assigned to an emergency number to display color and background accordingly, while displaying the alert notification message on the Quicklert Desktop Client and on smartphones screens.
This concludes the Quicklert Install and Configuration Guide. For more information on Quicklert, please contact your software partner or Quicklert at support@quicklert.com or call 1-800-789-1034.